
How To Access Your Raspberry Pi Remotely Using SSH Over The Internet
Accessing your Raspberry Pi remotely over the internet using SSH is a powerful way to manage your device from anywhere in the world. Whether you're a hobbyist, a developer, or an IT professional, this method allows you to control your Pi securely and efficiently. SSH (Secure Shell) is a protocol that provides a secure way to access your Raspberry Pi's command line remotely, and when combined with internet access, it opens up a world of possibilities.
In today’s digital age, remote access to devices has become a necessity. With Raspberry Pi being a versatile and affordable single-board computer, it is widely used for projects ranging from home automation to server hosting. However, accessing your Pi securely over the internet requires some setup and understanding of best practices. This guide will walk you through everything you need to know to set up and use SSH on your Raspberry Pi over the internet safely.
By the end of this article, you will have a clear understanding of how to configure SSH for remote access, troubleshoot common issues, and implement security measures to protect your device. Let’s dive into the details and explore how you can harness the full potential of your Raspberry Pi remotely.
Table of Contents
- Introduction to SSH
- Setting Up SSH on Raspberry Pi
- Configuring Your Router for Remote Access
- Using a Dynamic DNS Service
- Securing Your SSH Connection
- Common Issues and Troubleshooting
- Best Practices for Remote Access
- Advanced SSH Features
- Alternative Methods for Remote Access
- Conclusion
Introduction to SSH
SSH, or Secure Shell, is a cryptographic network protocol used for secure communication between two devices over an unsecured network. It provides a secure channel for executing commands, transferring files, and managing systems remotely. SSH is widely used because of its robust security features, including encryption and authentication, which protect your data from unauthorized access.
Why Use SSH for Raspberry Pi?
Using SSH to access your Raspberry Pi remotely offers several advantages:
- Security: SSH encrypts all data transmitted between your computer and the Pi, ensuring that sensitive information remains private.
- Flexibility: You can control your Pi from any device with an SSH client, whether it's a PC, Mac, or smartphone.
- Efficiency: SSH allows you to manage your Pi without needing a monitor, keyboard, or mouse connected to it.
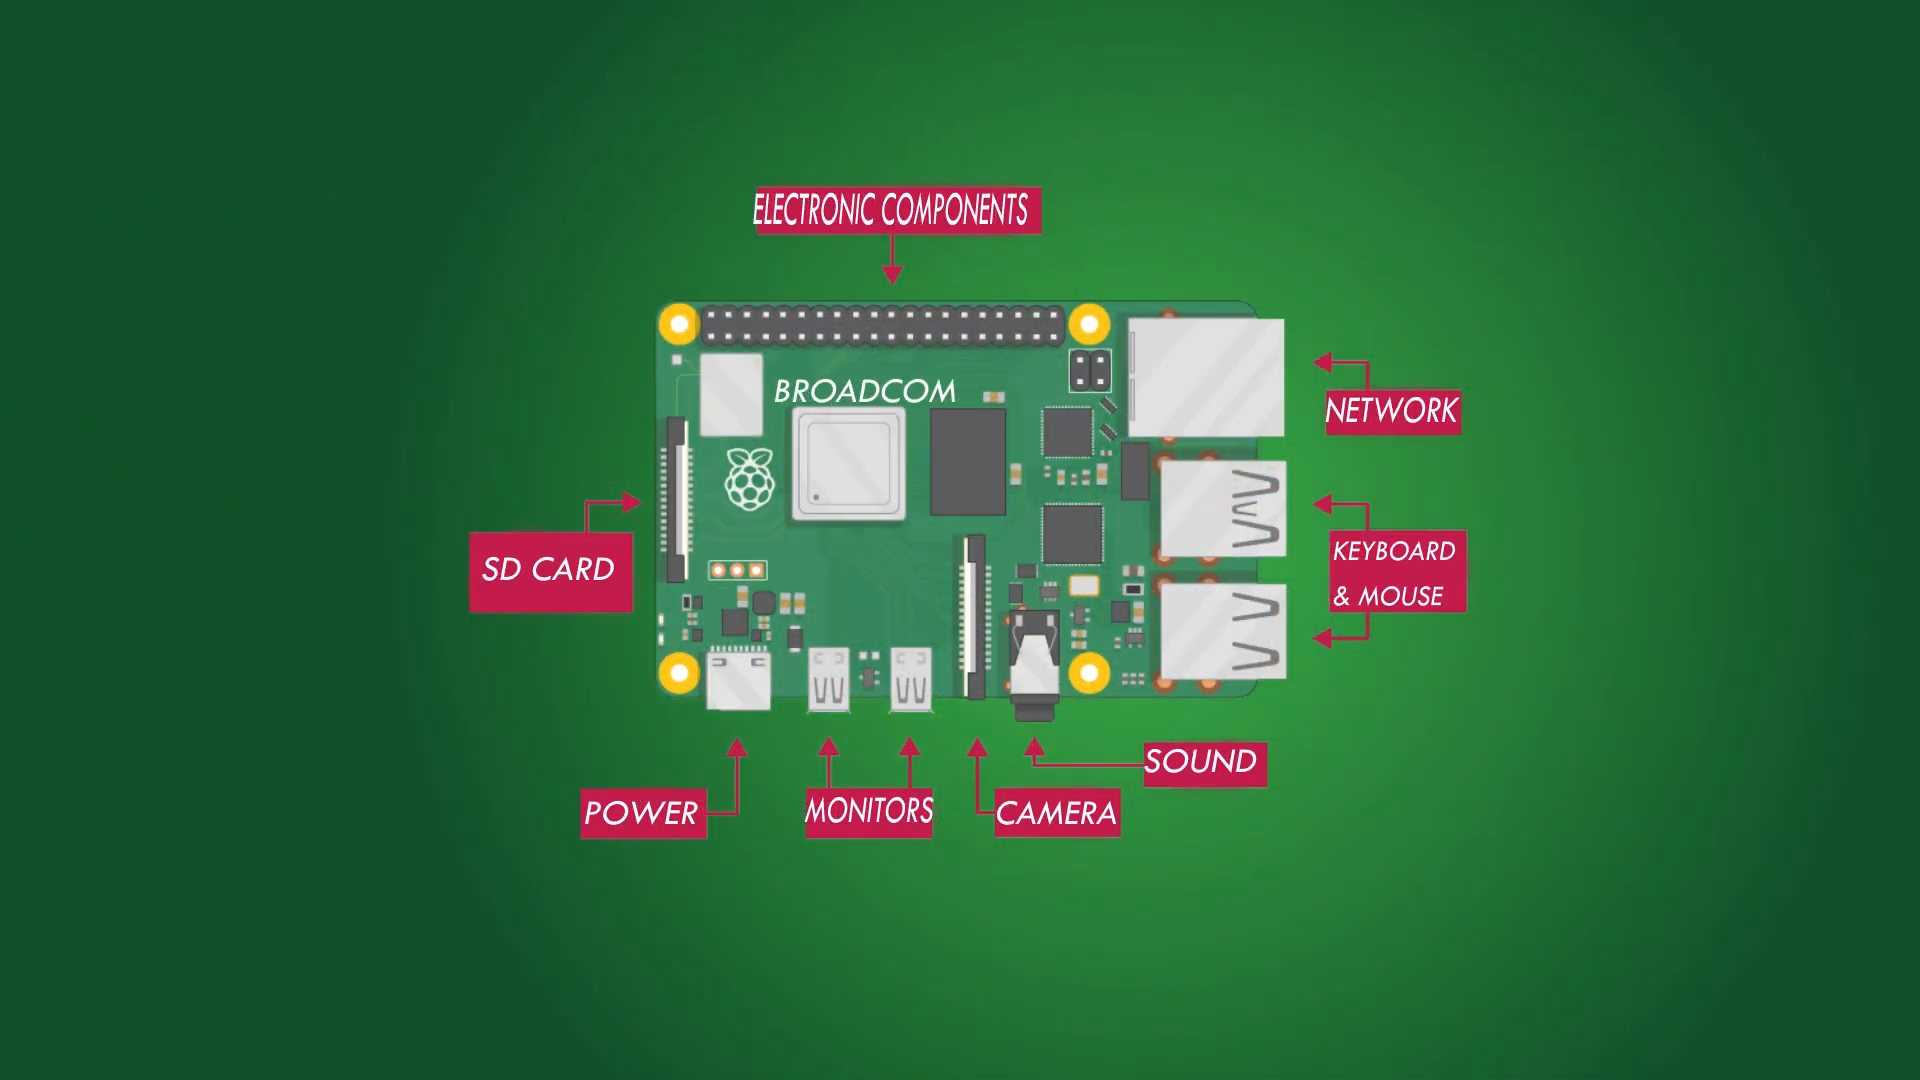
Setting Up SSH on Raspberry Pi
Before you can access your Raspberry Pi over the internet, you need to enable SSH on the device. This process is straightforward and can be done in a few steps.
Step 1: Enable SSH on Raspberry Pi
To enable SSH on your Raspberry Pi:
- Connect your Pi to a monitor, keyboard, and mouse, or use a pre-configured image with SSH enabled.
- Open the Raspberry Pi Configuration tool by running
sudo raspi-configin the terminal. - Navigate to "Interfacing Options" and select "SSH."
- Choose "Yes" to enable SSH and reboot your Pi if prompted.
Step 2: Find Your Raspberry Pi's IP Address
You will need your Pi's local IP address to connect to it via SSH. You can find this by running the following command in the terminal:
hostname -I
Configuring Your Router for Remote Access
To access your Raspberry Pi over the internet, you need to configure your router to forward incoming SSH traffic to your Pi. This process is known as port forwarding.
Step 1: Log in to Your Router
Access your router's admin panel by entering its IP address (e.g., 192.168.1.1) in a web browser. Use the username and password provided by your ISP or the default credentials listed in the router's manual.
Step 2: Set Up Port Forwarding
Once logged in:
- Navigate to the "Port Forwarding" section (this may be under "Advanced Settings" or "NAT").
- Create a new rule to forward port 22 (the default SSH port) to your Pi's local IP address.
- Save the changes and restart your router if necessary.
Using a Dynamic DNS Service
Most home internet connections use dynamic IP addresses, which change periodically. To avoid losing access to your Pi, you can use a Dynamic DNS (DDNS) service to assign a domain name to your IP address.
Popular DDNS Services
Some popular DDNS services include:
- No-IP
- DuckDNS
- Cloudflare
How to Set Up DDNS
Sign up for a DDNS service, configure it on your router or Pi, and use the provided domain name to connect to your Pi remotely.
Securing Your SSH Connection
While SSH is secure by design, additional measures can enhance your connection's safety.
Change the Default SSH Port
Changing the default SSH port (22) to a non-standard port can reduce the risk of brute-force attacks. Edit the SSH configuration file:
sudo nano /etc/ssh/sshd_config
Change the line Port 22 to a different port number, save the file, and restart the SSH service.
Use Key-Based Authentication
Key-based authentication is more secure than password-based authentication. Generate an SSH key pair on your local machine and copy the public key to your Pi.
Common Issues and Troubleshooting
Here are some common issues you might encounter and how to resolve them:
- Connection Refused: Ensure SSH is enabled on your Pi and the correct port is open on your router.
- Incorrect Password: Double-check your credentials or switch to key-based authentication.
- Timeout Errors: Verify your Pi's IP address and ensure your router's firewall allows SSH traffic.
Best Practices for Remote Access
Follow these best practices to ensure a smooth and secure remote access experience:
- Keep your Raspberry Pi's software up to date.
- Use strong, unique passwords or SSH keys.
- Regularly monitor your Pi's logs for suspicious activity.
Advanced SSH Features
SSH offers several advanced features that can enhance your remote access experience:
- Tunneling: Use SSH to forward ports and access services securely.
- Reverse SSH: Access your Pi from behind a firewall using reverse SSH tunnels.
- SSH Multiplexing: Reuse an existing SSH connection to reduce latency.
Alternative Methods for Remote Access
While SSH is the most common method for remote access, other tools can also be used:
- VNC: Provides a graphical interface for remote control.
- Web-Based Interfaces: Use web apps like Portainer for managing Docker containers.
Conclusion
Accessing your Raspberry Pi remotely using SSH over the internet is a valuable skill that opens up endless possibilities for remote management and automation. By following the steps outlined in this guide, you can set up a secure and reliable connection to your Pi from anywhere in the world.
We encourage you to share your experiences, ask questions, or suggest improvements in the comments below. If you found this article helpful, don’t forget to share it with others who might benefit from it. For more guides and tutorials, explore our website and stay tuned for updates!
Article Recommendations

Detail Author:
- Name : Maye Leffler
- Username : vesta.von
- Email : lexi67@rutherford.com
- Birthdate : 1976-01-17
- Address : 846 Grady Port Suite 751 East Albert, AL 79767-8701
- Phone : 1-747-354-6934
- Company : Goyette PLC
- Job : Plating Operator
- Bio : Excepturi voluptatem aperiam molestias dolorem et nesciunt. Assumenda magni quas aperiam nemo officia saepe. Perspiciatis veniam ducimus nulla pariatur doloribus.
Socials
linkedin:
- url : https://linkedin.com/in/kshlerint
- username : kshlerint
- bio : Aliquam voluptas et similique aut molestiae.
- followers : 4541
- following : 2548
tiktok:
- url : https://tiktok.com/@tad_official
- username : tad_official
- bio : Et recusandae nihil exercitationem ipsam.
- followers : 5559
- following : 2720
twitter:
- url : https://twitter.com/tkshlerin
- username : tkshlerin
- bio : Quam reprehenderit dolor nemo dolorem non. Et quia laudantium in qui architecto inventore. Nobis debitis rerum ipsa dolor.
- followers : 6272
- following : 2038
instagram:
- url : https://instagram.com/tad_kshlerin
- username : tad_kshlerin
- bio : Provident qui tempore molestias aut debitis dolores qui. Ipsa accusamus non ipsa et non officia.
- followers : 2467
- following : 215
facebook:
- url : https://facebook.com/tad.kshlerin
- username : tad.kshlerin
- bio : Quas eos laboriosam reiciendis aliquam. Accusamus sed nulla et placeat earum.
- followers : 2422
- following : 1168
